Social Science PhD Tech Stack
Kevin A. Bryan - September 2025
What software should you set up and use as a PhD student in the social sciences in 2025 (this document was prepared for training at Toronto Rotman in September 2025, as the first part of a three-part "tech stack" series)? Your research must be reproducible, efficient, and open. This is true whether you are a theorist, programming gigantic empirical models, or working with qualitative interview data. This document is intended for new social science PhD students, and is meant to be the bare minimum, but also to convince you that doing things properly is not that hard. Develop good habits from the start!
What does reproducible, efficient, and open mean? Reproducible means that your entire paper can be recreated, from raw data to final readable draft, with one line of code. It also means that raw data is never touched, but only analyzed, and that any changes are carefully tracked ("version control"). Efficient means you use modern tools, especially AI tools, to do good work more quickly, and to raise the bar on what good work looks like. Open means your data is available to others, and your working papers are on the internet in a clean and readable format.
My recommendation if you are new (all this will make sense soon!): 1) Read this document 2) Set up the accounts and download the applications at the bottom of this page. 3) Try to set up from scratch a new project folder, add a readme document and one data file, and try to push it to your GitHub, then pull it down. 4) Create a very simple LaTeX file, type a paragraph including mathematics, and save it to the "drafts" folder for your project. 5) Push this to your GitHub. 6) Edit the LaTeX file in Cursor, and compile to a PDF inside of Cursor. 7) Push this to your GitHub, and observe the "diff" for this .tex file. I bet that by the end of today, you can understand each step here!
Contents
Reproducibility Part 1: Starting a Project
I recommend creating the following folders on your computer.
Ideas Folder A set of text or Markdown files where you jot down notes about ideas you have. When you notice things in the world, hear an interesting idea, read an interesting paper you may wish to extend, put these notes here.
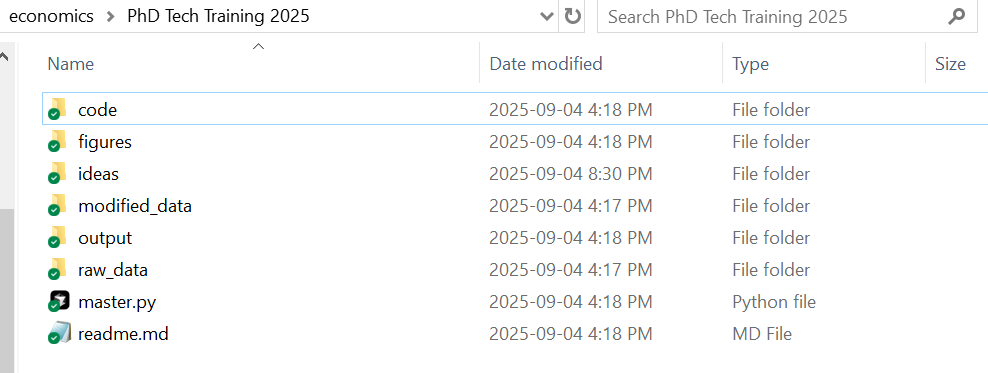
New Project Folder Each time you start a new project, create a new folder with a relevant name. In that folder, add the following subfolders: raw_data, modified_data, drafts, figures, code, ideas. In the base folder, you should have two files. A text file called readme.md which will eventually list everything a reader needs to know to replicate your paper (and for now can have your notes), and a "master" code file if there is any code involved (we'll discuss this in a bit). You can make those two empty files for now. Now you are set to begin working on a paper.
I usually set up a folder like this once I have done enough playing around on scratch paper to convince myself this idea has some merit. If it's theory, this is when I've worked out the basic proofs. If an empirical paper, once I've thought a bit about why the question is interesting and what data I would need and identifying assumptions I require to answer the question. But I set this up very early.
Reproducibility Part 2: Version Control
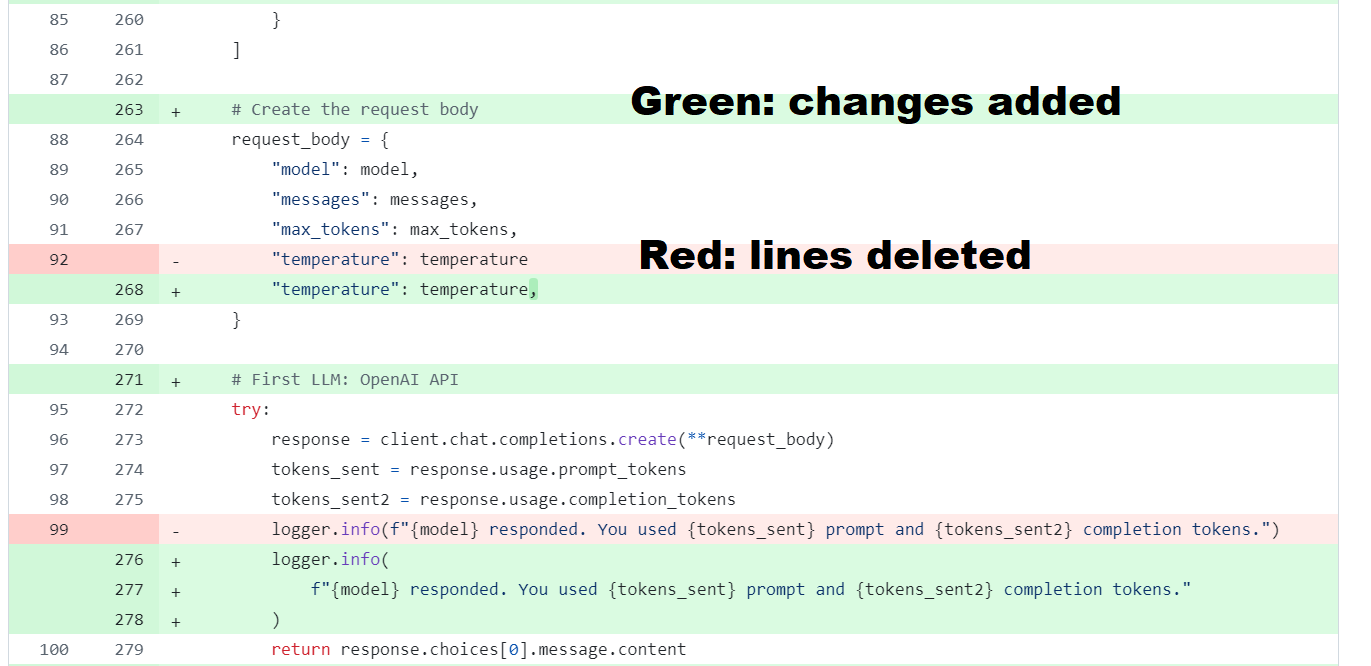
Version control means tracking every change to your files over time with a complete history of who changed what, when, and why. The most common tool used among software engineers is Git download, which works with platforms like GitHub download. Git tracks every change to your writing, code, and data. You always know what changed and why, it is very easy to compare with "diffs" what you changed (the red and green below), and you can undo mistakes instantly. Collaboration becomes straightforward since Git lets you see exactly what your coauthors have done.
That is to say, for every project, you should have all your work backed up, be able to easily see who changed what and when and how, and have your folders structured so that the entire paper from raw data to the final readable document can be created from running one file. Why, you may ask, not just use Google Drive download or similar? While these are great for backup, Git excels at comparing changes precisely (you can see exactly which words or lines of code changed), branching to try different approaches without losing your main work, merging contributions from multiple collaborators safely, and maintaining a complete searchable history with descriptions of why each change was made.
Basics of Git
We first need to install Git on your computer. It is free. You only need to do this setup one time. We'll give you the basics here, but for more detail, consult "Using Git for Social Scientists" by Jesús Fernández-Villaverde.
Windows
First, install "Git for Windows" using the standard installer. Then, open Command Prompt (search "cmd" in Start menu) to set your identity by typing the following commands:
git config --global user.name "Your Name"
git config --global user.email "you@example.com"
macOS
Install Git via Homebrew with brew install git, or via the instructions you can find at git-scm.com. Open Terminal (press Cmd+Space, type "Terminal") and set your identity with these commands:
git config --global user.name "Your Name"
git config --global user.email "you@example.com"
First-time Repo Setup
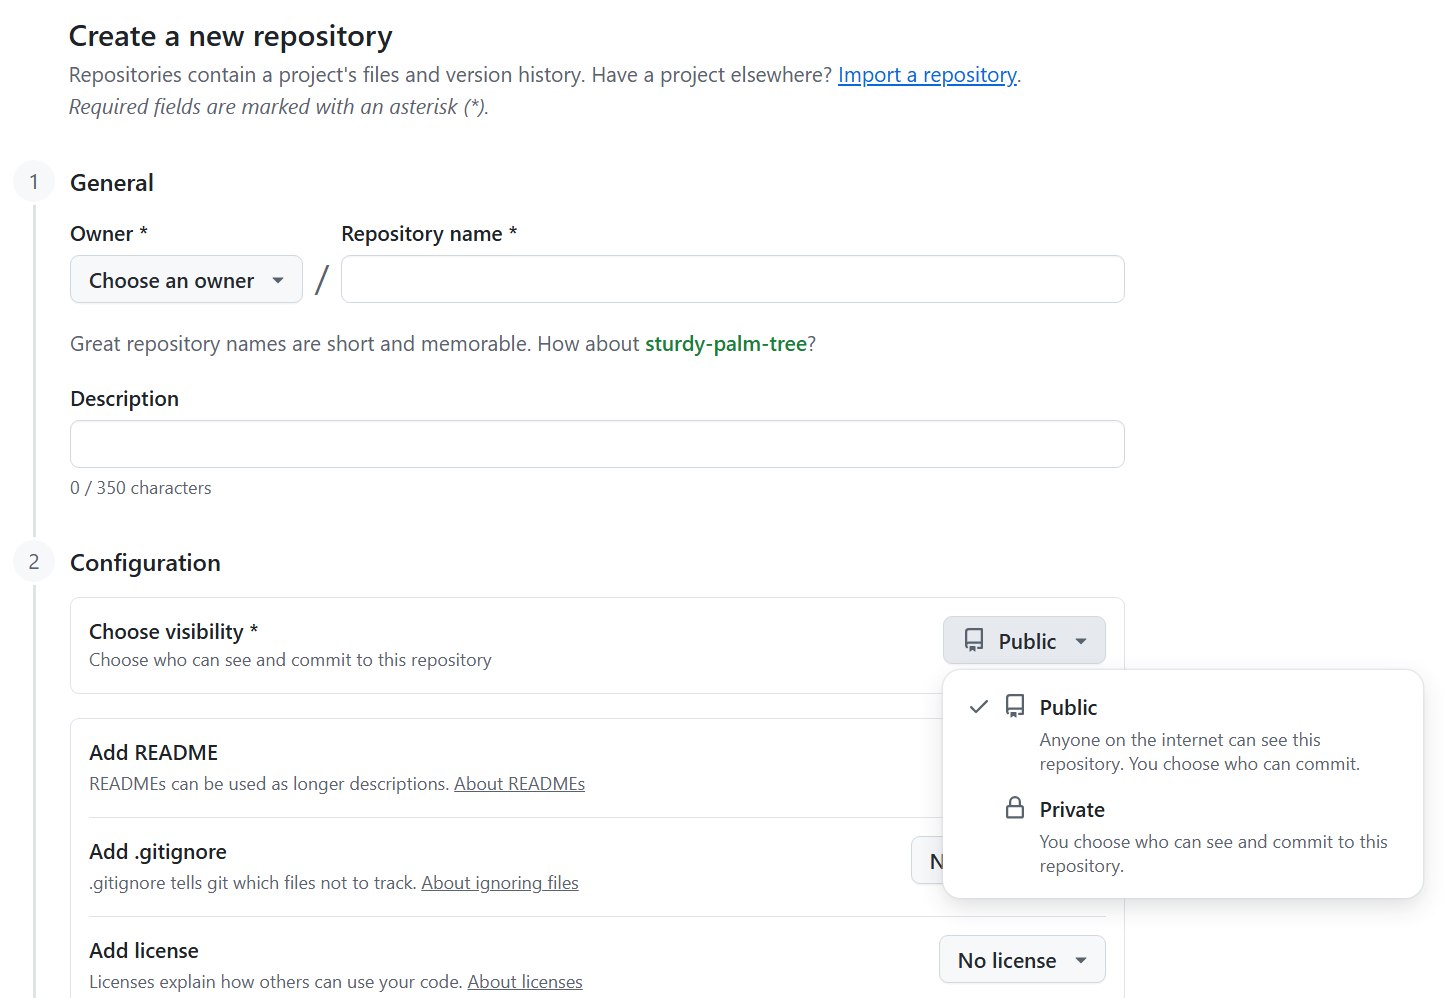
GitHub works on "repositories" (or "repos"), which are basically the folder of files related to a given project, including data, code, and writing. To set this up, go to GitHub.com, create an account, click "New" under Repositories, give it your project name, and choose "Private" for now, because otherwise all of this will be open to anyone on the internet.

Now, the first time you set up a Git repo for a new project, open the command window (Command Prompt on Windows, Terminal on Mac), navigate to your project base folder using cd /path/to/your/project, and type:
# These two lines link your computer folder to the GitHub repo you just set up.
git init
git remote add origin https://github.com/USERNAME/PROJECTNAME.git
# These two lines add every file in this folder to be "staged"
#   then add a comment for you to remember what new things you did
git add .
git commit -m "Initial commit"
# "Push" sends these files up to GitHub
git push -u origin masterDaily Workflow
Now that you have a repo, just do this every day for the project you are working on. When you are ready to start work, open the command window (Command Prompt on Windows, Terminal on Mac), change directory to your project folder with cd /path/to/your/project, and type:
# pull down from the internet the latest master version of your project
git pull
# optional but good: use a "branch" to do your daily work
git checkout -b experiments-today
This will pull down the last version of your project you saved, including all your writing and code and data, and create a branch to experiment on. Then at the end of the day after you have finished doing whatever you were working on, type from the command prompt:
# get all your files ready to be sent back to GitHub
git add .
git commit -m "Daily changes"
# send everything back to the "master" directory
git checkout master
# merge all of your work today back into the master branch
git merge experiments-today
# "push" it up to GitHub
git push
# delete the daily work branch
git branch -d experiments-todayWorking with Other People
If you follow the workflow above and someone else has made changes, Git will tell you there's a "merge conflict." Don't panic! Git will show you exactly where the conflicts are (marked in the actual files with special symbols like <<<<<<<), and it's easy to understand if you use tools like Cursor download which we discuss below. You simply edit the file to keep the parts you want, remove the conflict markers, then commit as usual. Software engineers working in teams normally send daily changes as "pull requests" which their partners review before merging back in on the GitHub website. This might be worth learning (it's very simple) if you frequently work simultaneously, but the simpler method is fine for now.
A Few Extra Git Tricks
You can add a .gitignore file to your project base folder. This is just a text file called ".gitignore" listing any directories and files you don't want to back up.
Keep large or raw data outside of Git and reference it locally, in case you have raw data that is very large. A simple way is the direct path method: put your big files in a synced cloud folder and, in your code, read from that path (e.g., ~/Dropbox/project_data/...).
Git seems tough - but I literally never type any other Git-related command than the handful of lines above. That's all you need to have very clean version control, on any project.
Reproducibility Part 3: What to Use for Code
I strongly recommend writing all of your code in Python download or R download, used within Cursor download, an AI-enhanced code editor. This combination lets you leverage AI assistance to write better code faster. Python is heavily used across disciplines, so package errors are found and fixed quickly. AI tools are exceptionally good at helping with Python. Python and R are both free.
R is excellent for statistical work and has beautiful graphics packages. Julia is good for computationally-intensive tasks, but if you're asking whether you need it, you probably don't. STATA and MATLAB are almost certainly unnecessary for modern social science work. They are expensive, have a number of well-known pitfalls that are hard for you to avoid, use very strange syntax (especially STATA), are less reproducible, and are closed systems that work poorly with AI.
Virtual Environments and Replication
Both R and Python work by installing "packages" - add-on libraries that let you make graphs, run statistical analyses, handle data, and so on. The reproducibility problem is that package versions change over time. The analysis that works perfectly with version 1.2 of a statistics package might break or give different results with version 1.5.
The solution is a "virtual environment", essentially a sealed box containing the exact versions of all packages your project needs. Anyone can recreate this same box and get identical results. This is not hard - a few lines at the start of the day - but the exact structure varies a bit depending on your workflow.
Project Structure
Small Projects (one notebook approach): For simple analyses, put everything in a single file that mixes code, results, and explanations together. In Python, this is called a Jupyter notebook (files ending in .ipynb). In R, this is called R Markdown (files ending in .Rmd). These "notebook" files let you write code in chunks, see the output immediately below each chunk, and add explanatory text between chunks. When you're done, you can export to PDF or HTML for a complete report. The files are in a structure like this:
my_project/
+-- data/
¦   +-- survey_data.csv
+-- analysis.ipynb          # Everything in one Jupyter notebook
Larger Projects (master file approach): For complex projects, break your work into separate files for different tasks (data cleaning, analysis, visualization), then create one "master" file that runs them all in order. Most projects will look more like this:
my_project/
+-- raw_data/
¦   +-- survey_responses.csv
¦   +-- interview_transcripts.pdf
+-- code/
¦   +-- 01_clean_data.py
¦   +-- 02_statistical_analysis.py
¦   +-- 03_make_figures.py
+-- output/
¦   +-- cleaned_data.csv
¦   +-- regression_table.tex
¦   +-- figure1.pdf
+-- drafts/
¦   +-- paper.tex
+-- master.py # runs the other code files in order
Your master file (master.py or master.R) should be simple - just a series of commands that run your other files:
# master.py example
import subprocess

print("Step 1: Cleaning data...")
subprocess.run(["python", "code/01_clean_data.py"])

print("Step 2: Running analysis...")
subprocess.run(["python", "code/02_statistical_analysis.py"])

print("Step 3: Making figures...")
subprocess.run(["python", "code/03_make_figures.py"])

print("Analysis complete! Check the output/ folder.")
Someone should be able to type python master.py (or Rscript master.R) and have your entire project run automatically from reading raw data to producing final tables and figures. No manual steps, no "remember to change this setting," no "run this part twice." This means:
- Your code automatically reads from
raw_data/ - Your code automatically saves results to
output/ - Your LaTeX paper automatically pulls tables/figures from
output/ - Someone else can run your master file and get identical results
- All of your code has comments throughout, variable names are easy to understand, and file names are easy to understand, with a readme you put together.
When you submit to a journal, when you want to revise results, or when you return to a project after months, you just run one command and everything rebuilds perfectly. No hunting through old files wondering "which version did I use for the final results?" It is not obvious to new PhD students, but projects take years. You will forget what you did.
Replication Files
When your paper is finished, creating replication files is easy if you followed the workflow above! Many journals (AEA, Management Science) now require full replication files. If your paper doesn't replicate exactly, they may unaccept it. Papers that don't follow proper workflow can be held up for six months by data editors. Do this right from the start!
Be Efficient with AI Tools
It is 2025. The answer to "how should I do X quickly" is to use AI to help you!
Coding with AI
When coding, I recommend Cursor download. The free version is an interface based on VSCode (commonly used for writing code), but it integrates frontier AI to assist you. I would guess I physically type 20% of the code I write; I'm mainly directing AI and proofreading (carefully!) what it gives me. The paid version is $20/month and well worth it because it has a much higher AI use limit, and frontier AI models are much better coders than older models. Students can get a year free, via the link in the What to Download section below.
If you get an error in your code, Cursor will often fix it automatically. Otherwise, paste your file plus the error message into Claude download or ChatGPT download and they'll find the mistake 99% of the time. Don't bang your head against the wall!
Theory and Proofs
If you do theory, you can get help on proofs, or even double-check them, with frontier models. The best current models are ChatGPT 5 Pro, Claude Opus 4.1, and Gemini 2.5 Pro download. For coding help, Claude remains excellent. These aren't perfect, but they're good enough to be useful daily. Google AI Studio gives you free access to top Gemini models.
Experiments and Surveys
If you're running a survey or experiment, paste your instructions into GPT or Claude and ask for "hypothetical answers" to find misleading language, just like a pilot survey would. Expected Parrot from MIT's John Horton does this at scale specifically for social science experiments.
Writing and Editing
Always "proofread" your work with a frontier LLM. They're better than any spell or grammar checker. I have a custom editor that lets you write very elaborate style rules, with a simple GitHub-style UX, at ModernEditor. I give my papers to LLMs before submission and ask for hypothetical referee reports - they often spot things I missed! Ben Golub's Refine.ink is an in-depth workflow using frontier models to evaluate logic and proofs like a good referee; worth giving your paper to it before submission.
My AI Toolkit
I have subscriptions to the best models ChatGPT, Claude, Cursor, and Gemini, plus I use APIs from major LLMs in my research. This costs over $500 CAD per month. You don't need this! For students, I recommend one $20 LLM (either Claude or ChatGPT) plus Cursor if you code. It will be very much worth it! This is just the starting point. AI is improving rapidly, so the best models today are different from six months from now. In 2027, I would be shocked if there is anything I can prove mathematically that a frontier AI can't do. For research using unstructured data like historical text, audio, or video, there are incredible new possibilities. This means that you need to plan your research agenda about where your human skills complement AI. To get up to date here, I recommend Anton Korinek's AI series for the Journal of Economic Literature (updated every six months) and Melissa Dell's deep learning work alongside her EconDL website.
Openness
Your papers should be online, free-to-read, and available as soon as you feel comfortable sharing them. Because many readers will see a version of your paper which is not "publication-ready" you should make the document they read look nice. What does it mean to write a nice looking paper?
I highly recommend using LaTeX download - this is a language made for separating design from content. You write your paper once. If you want a different design (say, to match a journal's bibliography style and so on), you just need to change one line. People get intimidated by LaTeX, so here is the easiest way to get used to it. Once your paper is written, you "compile" it into a PDF that is professional quality in terms of how the typography looks. Even better, you can easily include figures and tables via links that automatically update as you work on your code. Almost all practicing economists today use LaTeX.
You have two options for using LaTeX. The first is Overleaf download, an online platform that requires no installation and supports real-time collaboration. The second is a local setup running on your computer, which I recommend doing in Cursor because it has AI integration which makes editing easier.
For the latter, you will need to install a TeX distribution (TeX Live for Windows/Linux, MacTeX for macOS), add the "LaTeX Workshop" extension in Cursor, and then you can build .tex files and preview PDFs side-by-side.
In Cursor, once you have LaTeX Workshop installed, you can type Ctrl+Alt+B (Cmd+Option+B on Mac) to compile your document, and the PDF will appear side-by-side with your .tex file. Cursor's AI integration can help you with LaTeX syntax, table formatting, and even suggest improvements to your writing style; it even helps with syntax proactively.

Make TeX Tables Directly from Code
Have your code write tables to the output/ folder as .tex files, which you can then include in your paper with the \input command. This means every time you run your code, the table in your paper is EXACTLY what was given by the code. Do the same for figures.
% in LaTeX - include tables and figures directly from code output
\input{figures/table1.tex}
\includegraphics{figures/figure1.pdf}People get intimidated by LaTeX. Don't worry. Just copy the following code, and save it as "draft.tex" in your drafts folder:
\documentclass[12pt]{article}
\usepackage[margin=1in]{geometry}
\usepackage{setspace}\onehalfspacing
\usepackage{amsmath, amssymb, amsthm}
\usepackage{graphicx}
\usepackage{booktabs}
\usepackage{hyperref}
\usepackage[numbers]{natbib}

% Define theorem environments
\newtheorem{theorem}{Theorem}
\newtheorem{proposition}{Proposition}
\newtheorem{lemma}{Lemma}

% clickable links
\hypersetup{
  colorlinks=true,
  linkcolor=black,
  citecolor=black,
  urlcolor=blue
}

\title{Title Goes Here}
\author{Your Name \\ University}
\date{\today}

\begin{document}
\maketitle
\begin{abstract}
A one-paragraph abstract.
\end{abstract}

\section{Introduction}
Write your introduction here. You can reference other sections like Section \ref{sec:results}.

\section{Results}\label{sec:results}
Here's some inline math: $\alpha + \beta = \gamma$.

$E[Y|X] = \alpha + \beta X$

\begin{theorem}
This is how you state a theorem.\footnote{This is how you add a footnote.}
\end{theorem}

% Include tables and figures from your code output:
% \input{figures/table1.tex}
% \includegraphics{figures/figure1.pdf}

% References
\bibliographystyle{aer}
\bibliography{references} % expects references.bib in the same folder
\end{document}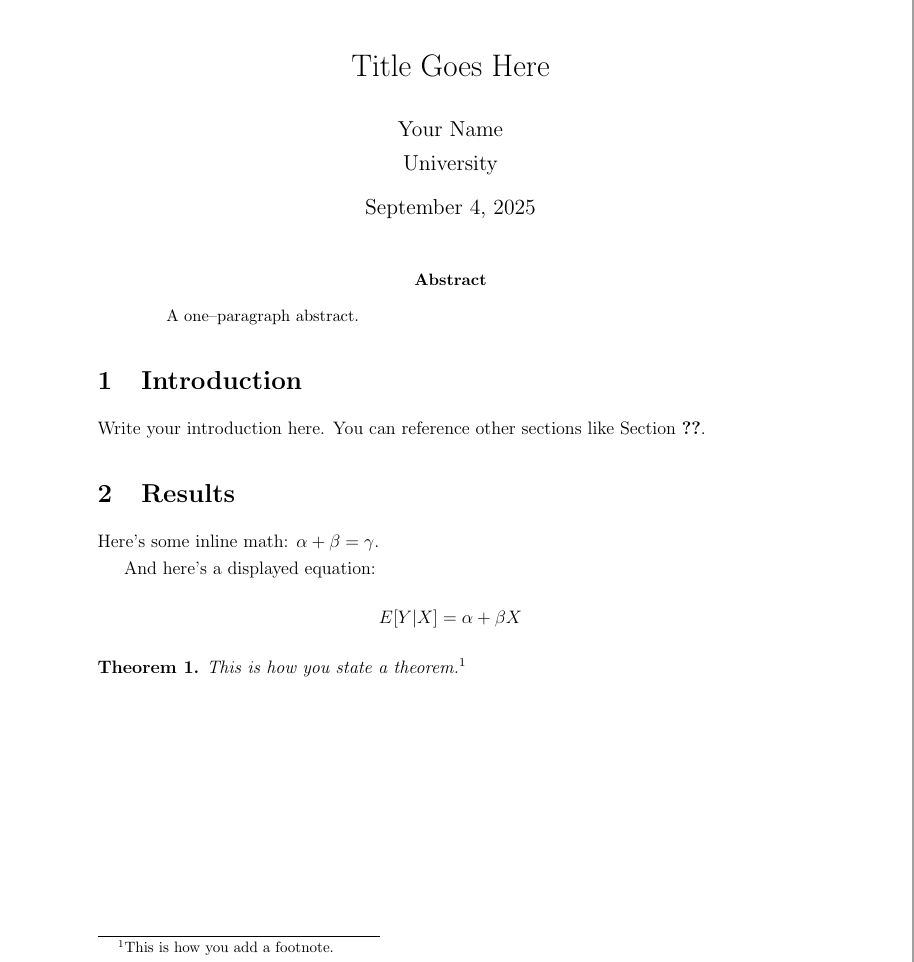
You can see how clean this looks! And for day-to-day writing, you just type like normal; once you learn how to type math in TeX, it becomes very fast. The benefit of doing this in Cursor is that it will use AI to auto-suggest LaTeX commands, help format equations, and even improve your writing. And you can auto-export LaTeX tables from R and Python.
Is all this LaTeX worth it? Absolutely. Your math looks professional, tables are beautiful and auto-formatted, typesetting is publication-quality, bibliography styles change with one line, and you can switch between journal formats instantly. There is also a slideshow format using LaTeX called Beamer where you can make slides with the same source material. Once your project uses .tex tables and figures, presentations become trivial.
If you use a local LaTeX via Cursor (or similar), your writing will also be backed up when you push to Git at the end of the day. If you use Overleaf, it is also possible to integrate Overleaf with your GitHub repository for seamless version control. See this guide on Git and Overleaf for details.
Citations: Zotero or Paperpile
For managing references, use either Zotero download (free, with the Better BibTeX plugin for auto-exporting .bib files) or Paperpile download (paid, but seamlessly integrates with Google Drive). Both tools save PDFs of papers organized by project, then auto-export citations in the format your chosen journal requires. In LaTeX, you simply cite with \cite{AuthorYear} and your bibliography is automatically formatted and linked.
Open Papers and Data
Your papers should be on your own website first (yes, you should have one!), and optionally on ArXiv or similar preprint servers. For an even more modern presentation, consider tools like my ModernPapers code, which will take your PDFs and convert them into AI-enabled, easy-to-read HTML versions (this matters especially when people read on their phone). If you have small projects in a Python Jupyter notebook or an R Markdown file, Quarto is a nice tool for making pretty display HTML for your website.
Your code should be publicly available, and your papers should be fully reproducible with one click. The point of academia is to produce useful knowledge! If your papers can't be read, you don't produce any useful knowledge. Put your working papers online as soon as you feel comfortable having them read!
What to Download
Set up and download the following software and accounts:
Cloud Storage and References
Google Drive - 15GB free, 100GB for ~$2/month. Use your Gmail address as your primary academic email since you'll switch schools but want continuity. I just forward my university mail to Gmail. Use Drive for Desktop to sync files locally.
Paperpile - Reference manager that stores PDFs and auto-exports bibliographies. Integrates seamlessly with Google Drive. Zotero is free alternative.
LLMs - Set up free accounts with ChatGPT, Claude, and Gemini. AI is a "jagged frontier" - worth trying different models on a given problem!
GitHub - Version control for your projects. Free for academic use. For large data files, keep them in your cloud storage and reference the path in your code.
Coding
Cursor - Code editor with integrated AI. Free pro version for students for one year. If you know VSCode, this is a supercharged fork.
Python - Download the latest stable Python 3.x from python.org. On Windows, check "Add Python to PATH." On macOS, use the universal installer or install via Homebrew.
R - Alternative to Python for statistics. Download from r-project.org. RStudio is the traditional IDE, but I prefer doing everything in Cursor for AI assistance.
Git Installation - Download Git for your operating system. Follow the platform-specific instructions in the Git Basics section above. This allows you to use Git repositories on your computer and send them to your GitHub account.
LaTeX Tools
LaTeX Distribution - Install TeX Live (Windows/Linux) or MacTeX (macOS). These include everything you need, including BibTeX for bibliographies.
Cursor LaTeX Setup - Install the "LaTeX Workshop" extension in Cursor for building and previewing PDFs side-by-side with your .tex files.
Overleaf - Web-based LaTeX editor. Alternative to local setup. Can sync with GitHub and cloud storage for automated figure/table updates.